I will admit it.
I am a girly-girl,I love dresses and skirts and pretty blouses.
So it wasn't that surprising that out of the four Winter Clever Charlotte patterns,the Raven was the last to be made up.
I was pleasantly surprised-and my girls are super pleased!
They love their Raven tops (Tilly's is suede and Liddy's is made of wool)
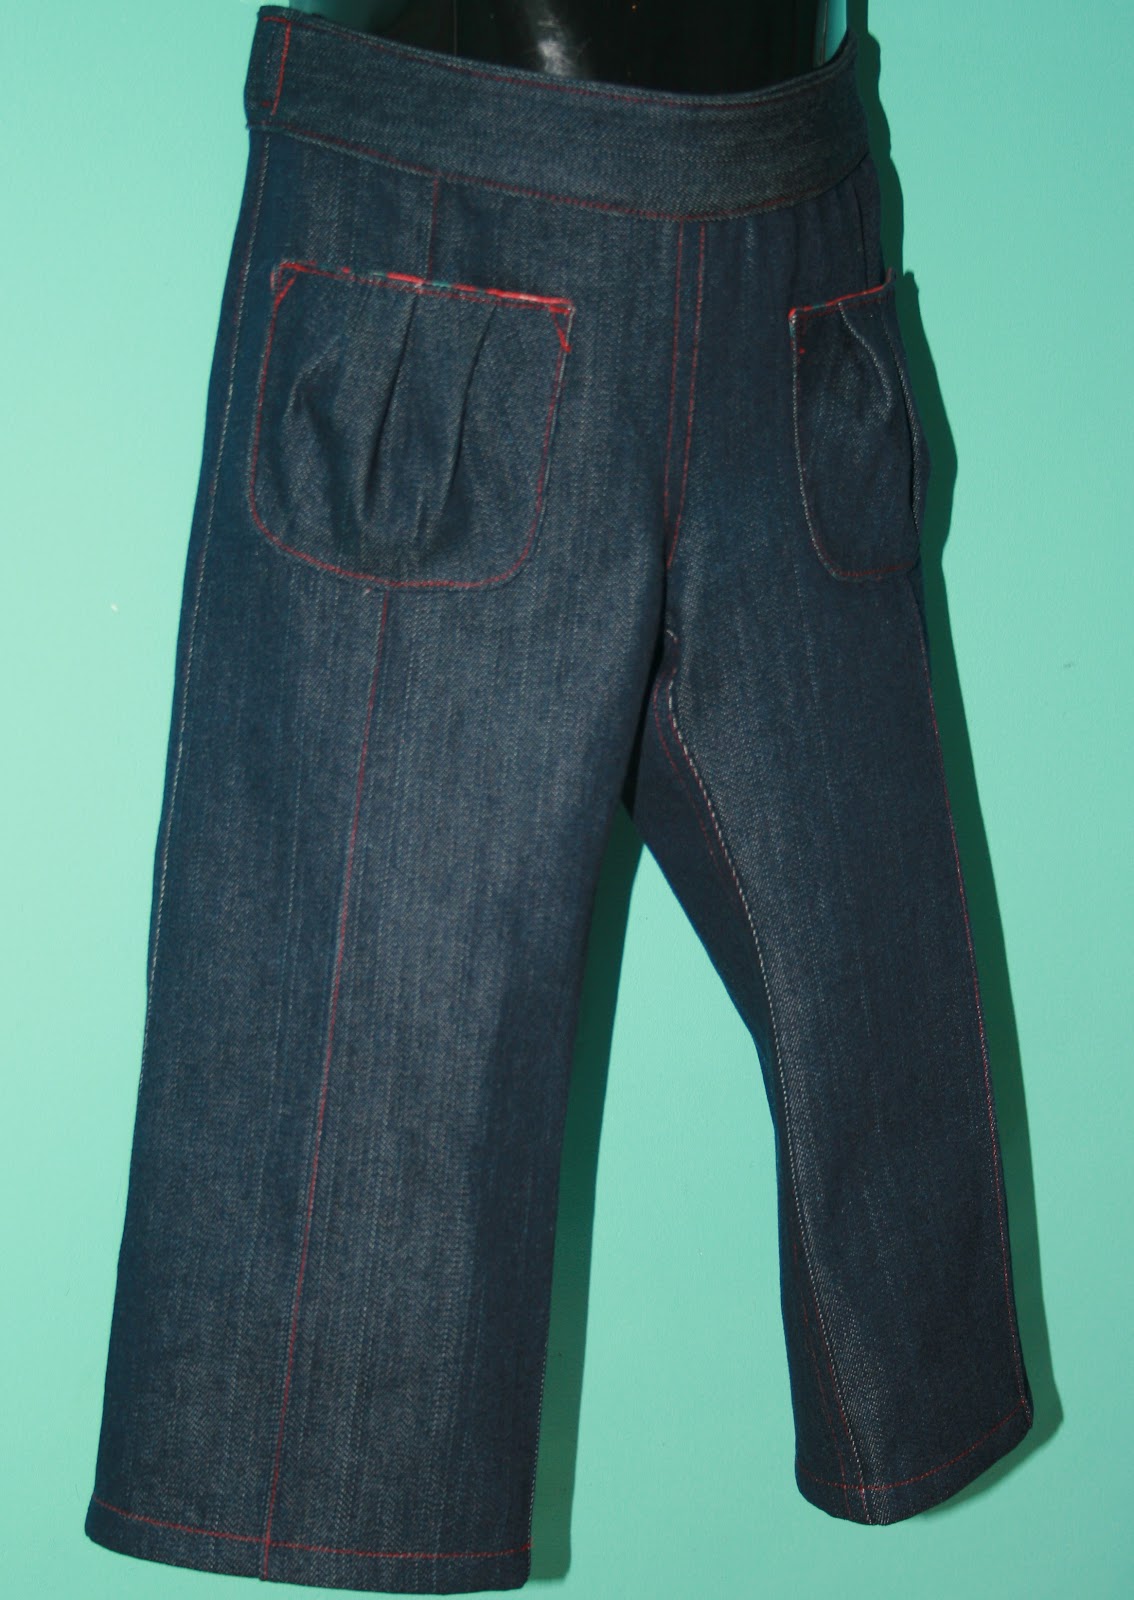
And today,while caring for a very poorly girl,I made the pants.
I used a rather robust indigo denim and I decided to top stitch them jeans style with a cherry red thread.
Matilda is such a mini moo I shortened the pants by an inch or so,mid length so I didn't alter the leg shape,and they were perfect!
I constructed the pants to the instructions but finished mine a little differently to give them the jeans feel.
Following the pattern instructions,interface one of the front waistbands.
Mark the pin-tucking line.
I snip the marking as a fold guide.
I then poked holes at regular increments and marked them with my marking pencil(thank you colette).
This gave me an excellent guide for folding along.
Press the pants front along the marked line.
Following the instructions,stitch the pin-tuck in place.
Consider adjusting your stitch length back to a smaller stitch.
Press the pin-tuck towards the outer leg.
I like to use a pressing cloth to avoid scorching my sewing thread.
This is just one of three pocket options-I will blog the other two presently.
Transfer the pattern markings.
I used the ''snip and pin'' method again.
Following the instructions,fold the pocket in half and mark the stitching line.
I used a pin as a ''stitch to'' guide.
Press the pleat open.
Right and wrong side view.
Following the instructions,stitch the other two tucks and press in place.
The wrong and the right side view.
Pin the lining to the outer pocket leaving an opening at the base for turning.
Consider sewing up to the seam allowance,it will make turning easier.
Trim the seam allowance and clip the corners.
Turn the pocket and use a collar point or a blunt pencil to push out the corners.
I chose to topstitch.
The genius of the pocket lining is that they have the lovely detail on the outside but there are no hidey holes for sand on the inside!
Shake them upside down and all the sand will fall out!
Place the pockets on the pants front.
I use my pattern as a guide,laying it over the piece and jiggling the pocket until it lines up.
If you cannot see through the pattern it is quite easy to feel it with your fingers.
Stitch the pockets in place.
Cute little pockets.
Following the pattern instructions pin and sew the inner front leg to the inner back leg matching notches.
The pattern suggests finishing the seams and press them open which I would do in a different fabric.
I pressed the seam to the back leg and top stitched.
In red!
Following the pattern,sew the crotch seam,matching seams.
Clip the curves.
If you are going to press this seam open I suggest neatening before sewing the two pieces together. I also pre-clip my seams so that the are inclosed somewhat in the neatening.
The neatened seam.
To carry on the jeans finishing,I pressed the seam to one side to top stitch.
Giving the fat seam a few whacks will soften the fabric and remove bulk.
Matching notches,pin and sew the side legs.
Again,it may be helpful to pre-neaten if you are going to press the seam open.
Press the side seam well.
I chose to top stitch the side seam-Oh yes,I am that determined!
But don't they look cute?
As directed,sew the front waist band pieces to the back waist band pieces,matching notches.
Press the seams open.
As I am top stitching through out this project I will be attaching the waist band in the opposite order to Charlottes instructions but still basically the same procedure.
I also like to interface my front waistband section rather then the traditional method of interfacing the waistband lining.
This would be a lovely place to have a pretty contrast fabric for the lining but bear in mind the weight of that lining fabric.
If it is too light weight the elastic will not sit nicely and it would be horrid if your pretty Liberty had washed and worn to holes and the denim was still sturdy and wearable.
I am speaking from sad experience.
At this point,consider pre-folding the edge of the outer waist band.
The outer waistband and waistband lining.
I then pinned the right side of the waistband lining to the wrong side of the pants.
Trim the seam and press up towards the waistband.
I then pinned the right side of the outer waistband to the right side of the waistband lining.
Sew the seam.
Trim the seam.
Press the seam up towards the main waistband.
Fold the waistband to the front covering the previous stitching.
Pin and sew in place.
Give the waistband a really good steamy press to set the shape.
I topstitched around the top of the waistband.
Unpick enough of the side seam to allow elastic to be threaded through.
I reversed over the seam a few times at the top of the waistband to make sure it was secure.
The pattern directions give great tips for using button hole elastic but my last lot was really dodgey so I will show you how to have an adjustable waist without it.
Using a large nappy pin,thread the pre-measured elastic(add a couple of inches to what is required) through the casing.
It can be helpful to trim off the corners of the elastic,it will thread more smoothly.
Pull the elastic nearly all the way through anchoring it through the pants with a pin and leaving a tiny bit outside the casing.
Slip the tiny piece of elastic in to the front waistband piece.
Stitch around the opening to secure it in place.
Alternatively,hand sew the opening closed.
Now unpick the other side seam.
I re-inforced the top and bottom of the unpicked seam.
Pin the extra elastic allowance.
Sew the tuck in place.
Pop the rounded end of elastic into the front casing as we did on the other side.
Pin and sew in place.
Give the waistband a tug and the tucked elastic will disappear into the casing!
Try the pants on the child for a length check.
Cute little tummy!
As directed,hem the pants.
Any fat seams are easily subdued.......
And then.....
Ta-dah!
Love the curved waistband!
Plenty of room for growth.
Ravishing with the Chickadee blouse.
A Raving success!
(Groan,I know)
Great pants-quick sew-awesome details!
They are a lowish cut so I am doubtful they would go over a cloth nappy(and Matilda would not oblige me and put one on to try)but they may fit over a disposable?
Liddy has a denim pair with green topstitching in the works and I am dreaming of a tweedy pair with suede trims and some coral silk for the lining for Tildy.
So go and get raving about the Raven!
x N


perfecto! They look so cute on her.
ReplyDeleteI am so glad that you made some for Missy M!
DeleteI would have not attempted them for Matilda otherwise,thinking they would be too big!
Thank you Susanne!
...and I love your girly hammer!
ReplyDeleteTwo Dollar shop bargain!
ReplyDeleteIt even has a screw driver inside the handle.
A girl likes pretty things to bash with....
x N
Love them Nicole! The weather's turned nasty here agan, so my thoughts are back to winter sewing....
ReplyDeleteThank you Justine,our weather is so crazy I never seem to pack things away(except swimmers)!
Deletex N
I love these pants! Red topstitching, too. This sort of thing is always in season in our mild coastal climate, too. I may have to invest in this pattern.
ReplyDeleteIt is a great fit Inder and definitely unisex,thus me sewing with red thread.
DeleteI live in hope.....
Thank you!
x N
Pants look great and really like the red top stitching detail.
ReplyDeleteSay, isn't the pocket lining the same fabric that Cindy used on her Finch top post? Clever minds must think alike!
Thank you Deb,I nearly went with coral but I thought the denim may run and spoil it and red is so nice on a boy or girl.
DeleteGood spy on the pocket lining. Matilda was most indignant that BK had HER top on! She has laid claim to the coral colour way of that collection.
Wonderful! Love the red top stitching on these.
ReplyDeleteYou could make these for Sweet Pea and hand them down Sharon.
DeleteThank you.
Oh ye! I am planning on getting this pattern later this summer. :) You sold me on it. ;)
DeleteThank you,that is the ultimate compliment.
Deletex N
I agree, Nicole - I love this pattern! Your denim with red stitching is great :)
ReplyDeleteThank you Sandi,I am silly to have taken so long to sew it-pants are much more practical on the farm.
DeleteGiggling once again over the appearances of the marking pencil and the thankyou.
ReplyDeleteI like the shape of these pants and they look great in the denim. I love the pic that is just pants and shoes, standing on the sewing desk.
That marking pencil is my best(sewing)friend Colette!
DeleteThe two piece waist band gives that lovely shape,the Finch shorts have the same.
Thank you,toddler tummies are so cute!
x N
I love these...I love everything about them...the top-stitching, the denim, the style...everything!
ReplyDeleteThank you Millie!
ReplyDeleteI have some wool jersey to make a long sleeve tee to wear with the Raven top and trousers for footy.
She should be nice and snuggy!
(But I will ned to put an enormous bow in her hair)! he he
x N
I have been thinking of making a Raven-style jean for my daughter--and I am glad you've doubly inspired me with the colored topstitching.
ReplyDeleteAlways happy to oblige!
DeleteI am so pleased with how the Raven sews up as jeans.
That two piece waist band is a thing of beauty!
Thank you Erin.
x N
LOVE, LOVE, LOVE these!
ReplyDeleteThought you might.....Thank you Sarah!
Deletex N
I LOVE your version of the Raven pants. Fab job on the topstitching...it looks great in Red!
ReplyDeleteThank you Cindy!
ReplyDeleteThey are a great trouser to sew aren't they? Good with a stiff fabric as there are not any little pieces.
And the sand proof pockets are perfect!
x N
Such cute pants! I've looked at these and the O+S After-School pants, trying to decide. I'll probably go with O+S because of the greater size range, but you make a great case for Raven with this version. And smooches for Matilda's tummy!! I still kiss on my youngest's, but it has long lost its "baby-ness". (and I am hoping hopes for you when the time is right, by the way!)
ReplyDeleteX0, Mary Margaret
Thank you Mary!
ReplyDeleteI have the O+S pattern too,itching to get to that!
I do love a baby tummy and keep your fingers crossed for me,won't you?
x N
Wow, what a fabulously clear instructional post. It's always so helpful to see how a pattern is completed with photos and comments by the sewer. I keep accumulating patterns but don't have enough time to sew them - now I need to collect some Clever Charlotte ones too! I often see your comments on various website, blogs and forums - thank you for being so generous with all of your tips and great blog posts!
ReplyDeleteStay cool in the heat that's coming your way - we're expecting 40 in Melbourne on Thursday!
Thank you Speedymog.
ReplyDeleteWhat a lovely comment to find and it was super nice to 'meet' you over at the O+S forum too!
xx N