''Please may I have another Swing Set Top and Skirt Mummy'' was the sweet request.
I have only recently made her one of these lovely oliver+s ensembles,but the Swing Set only goes to size 5 and the Birthday Party size 8,so I didn't need much persuading.
She chose some fabric from the City Weekend collection,the same as her last set,but this time in pink.
I would usually cut the bodice and the bodice lining in the same fabric,but to make it easy to see on screen I have lined it in white poplin.
Although turning seven,she is a minny moo, so the size 5 with a few inches added to the hem,fits beautifully.
Following the pattern,construct your shoulder ties. I made two last time convinced one would not be enough. I was wrong. Just cut one,you snip it into two later!
Following the pattern directions,apply interfacing as indicated on the pattern piece 2. I use a pressing cloth(white linen) to protect my iron.
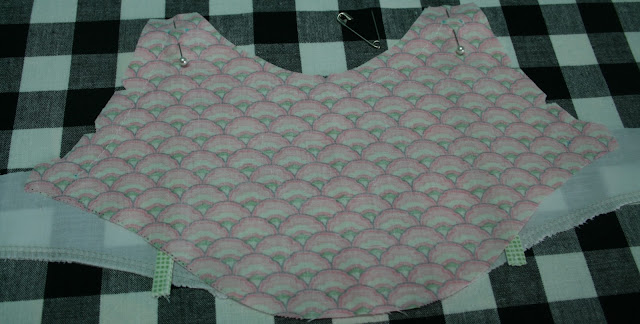
Pin the bodice front and bodice lining together,matching notches and marking dots. Pin between the dots. This is where you will sew. You will be stopping and starting. Don't sew the bodice in one continuing seam. It can be easier to finish the bodice lining raw edge BEFORE construction.
 |
| Bodice front. |
Following the pattern,slip the straps(the one cut evenly in half)through the gap that you left at the bodice shoulders when previously stitching. I find a small safety pin through the end of the strap makes it easier to push through the opening. Pin the straps in place and stitch the small openings closed.
 |
| Bodice lining |
Following the pattern directions,trim the seams FROM the notches on either side.
 |
| The trimmed bodice |
I like to trim the neck with pinking shears,you may choose to cut notches.
 |
| The bodice front |
Following the pattern,turn the bodice to the right sides out. Gently roll the seams so the lining doesn't show from the outside. Finger press and then iron the SEWN SEAMS only!
 |
| The bodice lining |
Following the pattern,transfer all markings. Sew the bodice front to the lining,right sides together. Sew only to the dots NOT the length of the seam(I have cut notches where the dots are). The lining is smaller as the front bodice will fold back and make a back placket later.
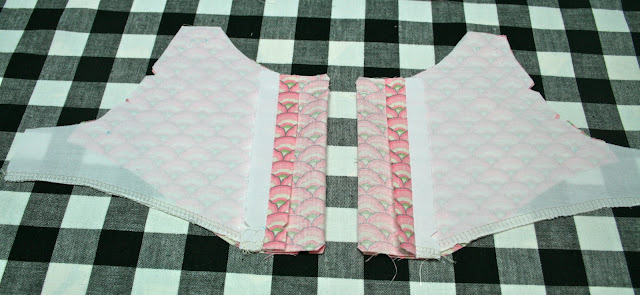
Press the seam open and then fold the lining to meet the bodice edges. Match the notches. The bodice should 'wrap' around and create a placket.
Following the pattern,transfer markings and pin between these markings,again there should be gaps at the shoulder seams
 |
| After stitching the seams |
Following the pattern,thread the straps of the front bodice through the shoulder opening of the back bodice,a safety pin may be helpful here again.
Pin these in place,checking they are even.
Following the pattern instructions,stitch these in place.
Trim the seams FROM the notches ie ONLY the sewn seams.
Turn the bodice through,roll the seams,finger press and then iron,
Following the pattern directions,separate and baste across the end of the placket.
 |
| Front bodice |
 |
| Back bodice |
Following the pattern instructions,gather the top of the ruffle pieces between the notches with two rows of number 4 stitches(I never touch my tension). I find it helpful to finish the ruffle sides before attaching them to the bodice.
Following the instructions,pin the gathered ruffle to the bodice front,right sides together,pulling up or easing the threads so the two pieces fit nicely. Pin the facings up out of the way while you do this step.
 |
| The inside view |
Stitch them together taking care not to tuck the gathers or bodice.
 |
| The outside view |
Following the pattern,pin the other ruffle to the bodice back taking care to not catch the lining.
 |
| The placket |
 |
| The underneath view |
 |
| The stitched seam |
Following the pattern,snip the edges of the placket to allow the bodice/ruffle seam to fold up under the facing.
The bodice/ruffle seam up, the placket seam down.
Neaten the placket seam,I like to use a narrow zigzag and later I sew my name tag over this seam.
 |
| The lining side |
Following the pattern directions,finish stitching the bodice to the bodice lining,take your time with this seam,I always seem to get little tucks that I have to unpick,smooth and re-stitch!
 |
| The bodice side |
 |
| The lining side |
 |
| The bodice side |
Press the seam up towards the facing.
Following the pattern,sew the side seams together carefully matching the seam where the lining joins the ruffle.
Press the seam flat and then open with a good steamy iron. Give it a good press!
Following the pattern,fold the lining back over the side seam,rolling so that the lining does not show from the outside. Finger press until happy with the seam and then iron press.
Following the pattern,topstitch the bodice close to the edge.
Following the pattern,topstitch the bodice yoke,being careful to keep both layers smooth.
Following the pattern,stitch the bodice lining to the side seam to hold it in place.
I like to sew my label over the placket seam.
Following the pattern,baste a stitching line as a hemming guide.
Fold and press a narrow hem,pin in place and sew.
Make your button holes and sew on your buttons. See HERE for some hints and tips on button holes.
I chose some slatey blue mother of pearl buttons to pick up the blue in the print.
The inside finished view!
 |
| Ta-dah |
Goodness,that was long.......I think I will stick to installments from now on! Is anyone still there?
If you are,I will be making the skirt tomorrow.


Still here .... LOL!
ReplyDeleteGreat post! I just found a place that has this out of print pattern so the timing of your tutorial was perfect for me.
......awaiting the skirt!
Thanks Deb, that seemed to go on forever!
ReplyDeleteIt is the dearest little pattern!
I cannot wait to see what you make...
I'm still here too! - and just added this pattern to my (ever growing) wish list. Might have to be quick for this one thought if it's out of print already.
ReplyDeleteHope she has a very happy birthday!
Thanks Catherine,it is such a sweet pattern and quite quick once it 'clicks' in your mind!
ReplyDeletedon't have this pattern, but enjoyed looking at the lovely fabric pics (fabric addict?)!
ReplyDeleteJoin the club togotroppo!
ReplyDeleteLooking at material is half the fun!
Thanks for this Nicole!!!
ReplyDeleteMy pleasure Justine!
ReplyDeleteAm finally making this and have come back for another read!
ReplyDeleteHurrah,its gorgeous!
ReplyDeleteLidia's is a wee bit snug around her chest,it may be the last summer for it but as she is nearly 8 thats not too bad!
Have fun!
x N
This is so helpful! I see where I went wrong with the armholes. I can also see how making a larger size than 0-3 months would make the construction easier! Thanks for sharing!
ReplyDeleteMy pleasure!
ReplyDeleteI think you are utterly amazing to have tackled the tiny size.
xx N
Thanks so much for the visuals! I googled this pattern to find help and I found it here. Going to finish up this dress tonight!
ReplyDeleteThank you LeeAnn, I really appreciate that.
ReplyDeletexx N
A year later, June 2016, and this tute is still a lifesaver! Thank you my sewing guru!!
ReplyDeleteThank you Sarvi.
ReplyDeletexx N